5、Log输出
这一小节中,要为我们的程序增加log输出能力。
最终是依赖于板子的串口来输出的
5.1 UART 硬件
我们的硬件平台是MPS2,使用的UART IP是 APB UART
参考:
DDI0479D_m_class_processor_system_r1p1_trm.pdf
DAI0385D_cortex_m3_on_v2m_mps2.pdf
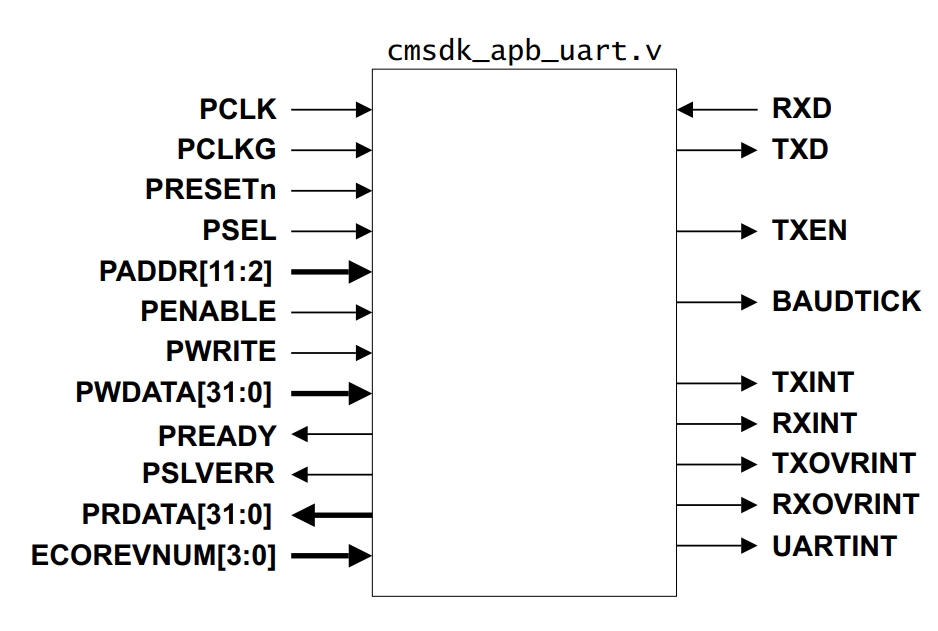
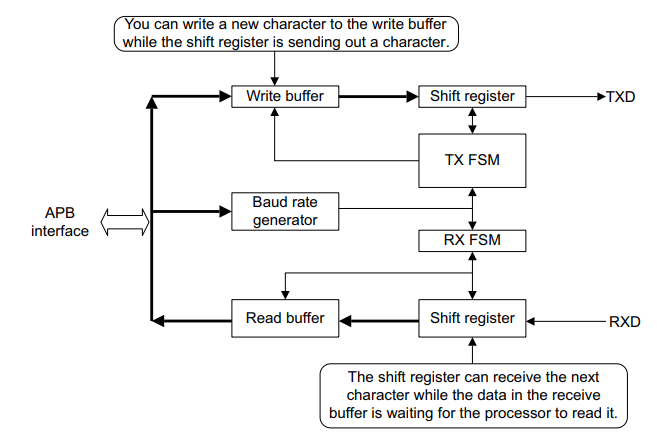
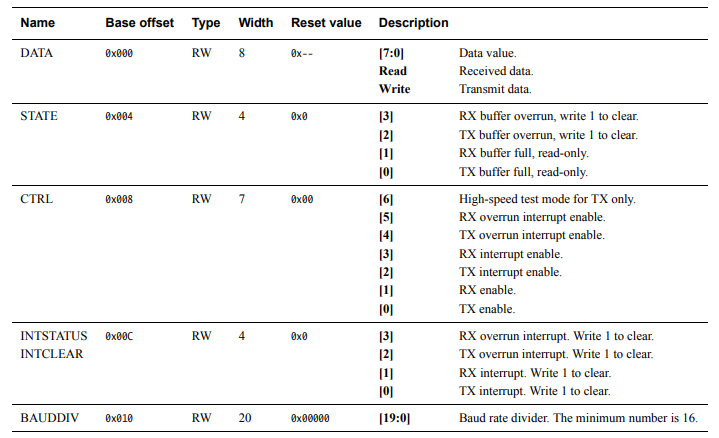
我们关心得几个寄存器,设置波特率(BAUDDIV),使能控制(CTRL),数据输出(DATA)
我们使用UART0,基地址为0x40004000
5.2 UART 软件实现
/*
* Copyright (c) 2021-2031, Jinping Wu. All rights reserved.
*
* SPDX-License-Identifier: MIT
*/

#include <apbuart.h>

typedef struct UART_t {
        volatile unsigned int DATA;
        volatile unsigned int STATE;
        volatile unsigned int CTRL;
        volatile unsigned int INTSTATUS;
        volatile unsigned int BAUDDIV;
} UART_t;

#define UART0_ADDR ((UART_t *)(0x40004000))

#define UART_CTRL_TX_EN (1 << 0)
#define UART_CTRL_RX_EN (1 << 1)

/**
* Initializes the UART
*/
void uart_init(void)
{
        UART0_ADDR->BAUDDIV = 16;
        UART0_ADDR->CTRL = UART_CTRL_TX_EN;
}

/**
* Output a char to the UART TX
*/
void uart_putc(char c)
{
        UART0_ADDR->DATA =  c;
}
Note
代码很简单,初始化设置波特率,使能,输出字符通过往输出寄存器写内容来实现。之后在main里面先调用uart_init,再调用uart_putc(‘h’)就能在qemu屏幕上输出’h’字符了。
5.3 Console 软件实现
之前的代码只能一个个输出字符,而实际使用中,我们需要输出字符串,打印变量值等,一般这部分功能都是在C库中实现的。
但是我们没有C库,所以我们需要自己写
/*
* Copyright (c) 2021-2031, Jinping Wu. All rights reserved.
*
* SPDX-License-Identifier: MIT
*/

#include <apbuart.h>

#define MAX_DIGIT_BITS 11  /* 8 char for number, 2 for '0x' and 1 for '\n' */
static const char HEX_TABLE[] = {'0', '1', '2', '3', '4', '5', '6', '7',
                                                                '8', '9', 'A', 'B', 'C', 'D', 'E', 'F'};

void bm_printf(char *s)
{
        while (*s) {
                uart_putc(*s);
                s++;
        }
}

static void to_hex(unsigned int value, char msg[])
{
        int i = MAX_DIGIT_BITS - 1;

        msg[i--] = '\n';
        for (; i > 1; i--, value >>= 4)
                msg[i] = HEX_TABLE[value & 0xF];
        msg[i--] = 'x';
        msg[i--] = '0';
}

static void bm_printf_hex(unsigned int value)
{
        char value_str[MAX_DIGIT_BITS];

        for (int i = 0; i < MAX_DIGIT_BITS; i++)
                value_str[i] = 0;

        to_hex(value, value_str);
        bm_printf(value_str);
}

void bm_printf_value(char *s, unsigned int value)
{
        bm_printf(s);
        bm_printf_hex(value);
}

void console_init(void)
{
        uart_init();
}
提供三个函数供外部调用:
console_init 初始化串口,开机时调用
bm_printf 打印字符串
bm_printf_value 打印字符串和16进制变量值
5.4 代码结构
.
├── bm.lds
├── build.sh
├── Makefile
├── README.md
├── rungdb.sh
├── runqemu.sh
└── src
        ├── board
        │   └── apbuart
        │       ├── apbuart.c
        │       └── apbuart.h
        ├── common
        │   ├── console.c
        │   └── console.h
        ├── core
        │   └── start.S
        ├── main.c
        └── test
5.5 运行结果
int main(void)
{
        unsigned int test = 0x12345678;

        console_init();
        bm_printf("Enter main!\n");
        bm_printf_value("This is test value:", test);
        return 0;
}
root@iZj6ccyu2ndokc2ujnox0tZ:~/workspace/code/baremetal/baremetal-m3# ./runqemu.sh
not use gdb, just run
Enter main!
This is test value:0x12345678
到这里我们的代码不仅支持C函数,还可以打印log了。
__Vectors:
        .long           0x1000                          /*     Top of Stack */
        .long           Reset_Handler           /*     Reset Handler */

        .thumb_func
        .globl   Reset_Handler
Reset_Handler:
        ldr r0,=0x10
        ldr r1,=0x40004010
        str r0,[r1]
        ldr r0,=0x1
        ldr r1,=0x40004008
        str r0,[r1]
        ldr r0,='h'
        ldr r1,=0x40004000
        str r0,[r1]
考虑最小系统,让m3跑起来并输出log,实际上只需要上面这十几行代码就够了,对应到到 binary 几十个bytes。